Just I had explained in previous post, even just for learning purpose if you want to experience real power of SQL Server, then you should atleast have Standard edition of SQL Server 2008. But if you can get Developer edition then it is better, because developer edition is an enterprise edition which can’t be used for production server and so you will have more closer look of enterprise level DBMS. And it is very cheap to buy.
Anyways, here is the process of installation … its pretty straight forward (just like all other MSFT products .. point n’n click :-D), so I will be showing screenshot of steps which requires careful selection.
I have installed it on, Windows server 2008 std edition with 1gb of RAM and core2duo processor. (i’ve used VMWare)
1. When you will insert DVD of Software, it will autorun. And you will get option menu something like this. Don’t get scared or confused of loads of options, just go to “Installation” option and choose standalone installation. (if you doubt about system requirements then you can always run “System Configuration Checker” from “Planning”)
2. As you will select standalone installation, it will fireup installation precheck script, which will check for supporting files (and if you don’t have it then it will install it for you)
3. You will be then required to insert product key, then you will be presented with option “Feature Selection” , here you can choose what you want to install. You can opt out to install other features such as SSRS, SSIS, or SSAS. Also you can choose to install just server or just client tools.
4. Then you will come to instance configuration screen. By definition SQL instance is pretty much same as Oracle instance. Its collection of objects and software itself. Here you can choose to have Default instance or Named Instance. Named instance is useful if your server will hold more then one instance. (As a rule, SQL Server can’t have more then one default instance.)
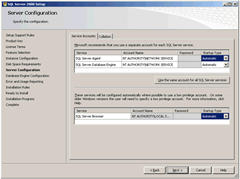
5. On Server Configuration screen, you can select which service will use will windows account. (Its one of the most important step if you are using domain controller to control user logins). Or if you are using it just for your study, then select “Use same account for all Services” also you can choose your “Collation” property of Database, it is property which is used to sort and store data in table. (if not sure then keep default)
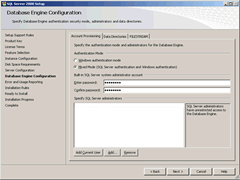
6. At next screen, you will be asked for Database Engine Configuration, where you can choose default data directory and directory for filestream (new feature) and most importantly to choose “Authentication Method”, (method that will be used for logging in SQL Server, if not sure just choose windows authentication which recommended by MSFT). But also need to remember that if windows authentication used then default account SA will be disabled. So I personally preferred to use “Mixed Mode” as it works for both windows and sql server logins.
And that’s it !!! You are now all set to explore and explode the world of SQL Server 😀
Now you are ready to take on, and so we will have more discussion about your newly installed DBMS.
Its just a thought … ![]()


