In First part of this How To I explained essential component required to manipulate MSI installation process and create funky installation process. In this part I will use that theory of 1st part and create an advance installation process which will do following steps as part of installation process …
1) Install a file at user selected location
2) Write a timestamp into that file
Under the hood this whole process actually includes more steps, this file is located into a temp folder from where this file will be copied to install directory and then I will write a timestamp to this file. And also I will remove that temp folder which was hosting this file originally.
Before anyone assumes that I am flippin’ genius or something and I have invented this whole thing, I would like to let you folks note that part of this post is based on MSDN post @ how to create custom actions in Installation projects. Rest of items are my ideas but believe me its not THAT difficult to make ‘em work ![]() …
…
Now with all wisdom … let’s begin …
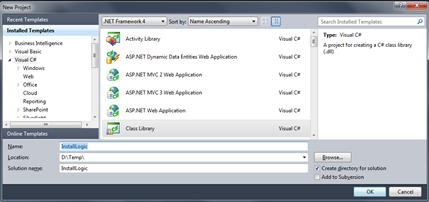
First step is to create a logic that will be used by installer … it is done with help of installer class. For that create new “Class Library” project in VS 2010 (as I babbled a bit earlier that VS 2012 doesn’t include template to create MSI projects). I have named my project “InstallerLogic”. Then delete default Class1.cs and add new item, “Installer Class”. It is located at Visual C# Items –> General –> Installer Class. Just to be consistent and to avoid confusion I have named my installer class as “InstallerLogic.cs” (I know I am not good with names … if you don’t like it … sue me .. ![]() ) As I explained in my previous post this class is a base class which is used by Installation Project and it has methods which corresponds to related events in installation process. If you are interested, this MSDN help should give you better idea about installer classes.
) As I explained in my previous post this class is a base class which is used by Installation Project and it has methods which corresponds to related events in installation process. If you are interested, this MSDN help should give you better idea about installer classes.
Now I want to do all funny things AFTER installation is done, which means it will come under COMMIT event (if you look at that MSDN link I just gave above it will show you that there are few other events like committing or committed too which may help you to tune your installation process better). So my commit method will look like something below …
public override void Commit(IDictionary savedState)
        {
            base.Commit(savedState);
            string installDir = Context.Parameters["InstallDir"];

            // File is expected to be located inside INSTALLDIR\temp\ folder
            string fileLocation = installDir + "temp\\ToBeEdited.txt";

            // DOS command arguments
            string copyCommand = "/c copy \"" + fileLocation.Replace(@"\\", @"\") + "\" \"" + installDir.Replace(@"\\", @"\") + "\" /Y";
            string deleteTemp = "/c rmdir \"" + installDir.Replace(@"\\", @"\")+"temp"+ "\" /S /Q";

            // Insert timestamp into file
            TextWriter twr = new StreamWriter(fileLocation,true);
            twr.WriteLine("\r\n"+DateTime.Now);
            twr.Close();

            // Test messages to verify copy command syntax
            MessageBox.Show(copyCommand);

            // Test messages to verify delete command syntax
            MessageBox.Show(deleteTemp);

            Process process = Process.Start(@"C:\windows\System32\cmd.exe", copyCommand);
            // Wait for operation to finish before moving to next step
            if (process != null) process.WaitForExit();

            Process.Start(@"C:\windows\System32\cmd.exe", deleteTemp);
            // Wait for operation to finish before moving to next step
            if (process != null) process.WaitForExit();
        }
As you will see, I have tried to explain each steps by including loads of comments on each of steps (plus these are really simple steps so it should not be much difficult to understand them ![]() ). This method is expecting one parameter … path of installation directory.
). This method is expecting one parameter … path of installation directory.
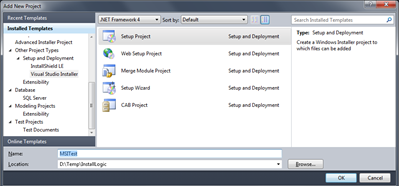
Second Step … is to create a setup project. For that add a new project, it is located at Other Project Types –> Setup and Deployment –> Visual Studio Installer –> Setup Project. Now, we want to create a folder called “temp” which will be used as temporary folder to keep a file which will be modified as part of installation process. For that goto “File System” and then into Application Folder create a folder “temp” and add a path of text file. For this I have created a file called “ToBeEdited.txt”. Just in case if you don’t know how to add a file for installation then use the 101 post for setup project which I blogged about a while ago.
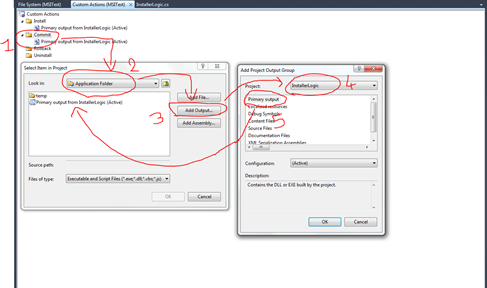
Once folder is created and file is added, next step is to create a custom action. Custom Actions basically adds little spice to boring installation process ![]() and it can be DLL, an EXE or a Script file. To add items to custom action, select Custom Actions for Installation Project and add project primary output of Installer Class here. To add an item to custom actions, select an event when you want to use your custom action (e.g. Install, Commit, Uninstall or Rollback) and then right click on that event and select “Add Custom Action” option which will open up another window.
and it can be DLL, an EXE or a Script file. To add items to custom action, select Custom Actions for Installation Project and add project primary output of Installer Class here. To add an item to custom actions, select an event when you want to use your custom action (e.g. Install, Commit, Uninstall or Rollback) and then right click on that event and select “Add Custom Action” option which will open up another window.
Here you have option to choose where you want to perform this action. In our case I wanted to perform something at installation directory so I selected “Application Folder”. There are 3 options to add items, by adding File (VBS,JS), Adding Output of another project (EXE,DLL) or Adding an assembly (DLL). This last option is particularly useful in cases when you don’t want to use .NET Framework as requirement to be able to use just installer ![]() . We will be adding output of Installer Class so I selected option to add output from project. Once that option is selected it will display list of project available in SAME solution. Even in project output you have different options but since we are interested in final outcome of t hat Installer Class project (which will produce a DLL) I will go with first choice Primary Output. And that’s all we need in this case.
. We will be adding output of Installer Class so I selected option to add output from project. Once that option is selected it will display list of project available in SAME solution. Even in project output you have different options but since we are interested in final outcome of t hat Installer Class project (which will produce a DLL) I will go with first choice Primary Output. And that’s all we need in this case.
Just as a side not if you get install state related error … I know that I only need this action for COMMIT state I still had to add output of project in INSTALL state as well because when this custom action gets performed. Actually I was getting strange “MyAction.Installstate” file not found error and after doing some Googling I found this solution from very old ASP.NET forum. This post explains reasons. Just quick copy-paste from same post …
The problem is that the MSI infrastructure is looking for the installation state file which is usually created during the Install phase. If the custom action does not participate in the Install phase, no file is created.
The solution is to add the custom action to both the Install and the Commit phases, although it does nothing during the install phase.
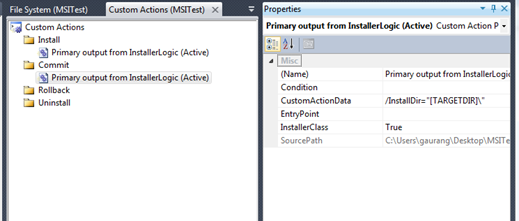
Third and final step is to pass parameters to our method used in Installer Class. It is done by using property of custom actions. Select “Primary output from InstallerLogic (Active)” (obviously name could be different in your case if you have different project name) in commit and CustomActionData property which actually passes parameters to installer class, set it’s value as /InstallDir=”[TARGETDIR]\”
And that’s last part. Once that is done, all I had to do was to build my solution and voila .. I have a MSI which creates a temp folder as step of installation and copies content of that folder (a file) from that folder to main installation directory and modifies that copied file and then it removes that temp folder (and its contents). I know it’s not very fancy but this has enough information to get you going and believe me only limitation now is just your imagination ![]() …
…
That’s it for now …. I have attached sample project for reference.
It’s Just A Thought … ![]()


