Recently I was tasked to create MSI installer for our current application which is in development phase. While browsing project types in VS, I had known that VS has ability to create installer using Install Shield, but that was pretty much of it. I have never worked with them before. But after working with windows installation project for few days, it looks pretty straight forward process to me. I mean of course, we can customize installer anyway we want and it can get pretty complex subject, but out requirement was not so fancy (at least at this moment ![]() ) so I am overall enjoying working with it.
) so I am overall enjoying working with it.
For this demo I have created a very simple console application in C# and I am creating installer for that app. This installer will allow user to install that app to any location, just like any other app. And this application is targeted for only 32bit machines. This console application basically runs in a loop until user quits it, with each loop it displays two random number and user is required to add them (I know its pretty basic app .. but this demo is for installer not for some fancy app ![]() ). I am actually following old MSDN walkthrough which explains step-by-step process to create MSI installer.
). I am actually following old MSDN walkthrough which explains step-by-step process to create MSI installer.
First, I have created a console application project “Installer Demo”. Like below.
using System;
using System.Collections.Generic;
using System.Linq;
using System.Text;

namespace InstallerDemo
{
    class Program
    {
        static void Main(string[] args)
        {
            char cont;
            do
            {
                Random r = new Random();
                int i = r.Next(1, 10);
                Console.WriteLine("First Number: {0}", i);
                int j = r.Next(1, 10);
                Console.WriteLine("Second Number: {0}", j);
                Console.Write("Total is: ");
                int k = i + j;
                var l = Console.ReadLine();
                Console.WriteLine(k == Convert.ToInt32(l) ? "True" : "False");
                Console.WriteLine("Another Addition ?? Y/N");
                cont = Convert.ToChar(Console.ReadLine());
            } while (cont == 'Y' | cont == 'y');

            Console.WriteLine("Bye");
            Console.ReadLine();
        }
    }
}
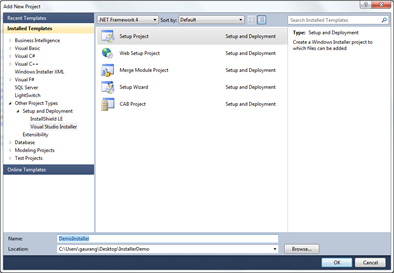
And then I added new “setup project” from Add New Project –> Other Project Types –> Setup & Deployment –> Visual Studio Installer –> ”Setup Project”.
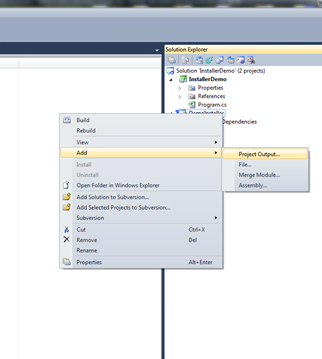
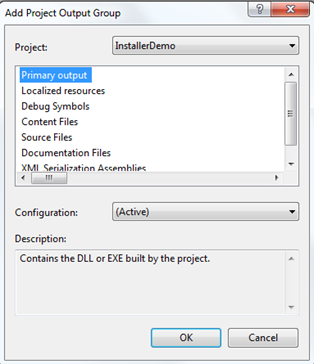
Once added, right click on project and select project output. Now we know that my “Installer Demo” project will generate an exe so for Project Output, I selected “Primary Output” option which will basically add whatever referred project will generate in BIN directory.
 |
 |
Since this “Installer Demo” project uses .NET framework, this installer project will add .NET references by itself (but sometimes you have to add reference manually). And that’s pretty much of it !!! If you build you application now, it will create MSI file with an EXE file. And then you can use tool like ORCA to edit MSI file settings. But I modified few setting right in project so I don’t have to use ORCA.
 |
 |
I have attached project that I have used for this demo.
That’s it for now.
It’s Just A Thought … ![]()

