There are many blog writing tools available presently. Some of them are integrated with browsers (say, Scribefire for Firefox or Blog uploading tool in Flock browser) and some are standalone app. like Windows Live Writer (WLW for short), hell even there are some paid blog writing tools are available too ( i wonder who will pay for this sort of tools as we already have free good alternatives ), Rocket Post and Mars Edit are few to name !!!
I am new recruit of this blogosphere, but I know sometimes it makes our life easy if we have blog writing tool at our disposal. We can write, edit or can do anything we want even we are not connected to internet (which is a bit difficult for me , i can’t live without internet.). So, I have been using Windows Live Writer from the day one I created my blog.
So, in today’s how to I will show how to setup Windows Live Writer to work with Self hosted WordPress Blog.
- Step 1: Download and Install WLW.
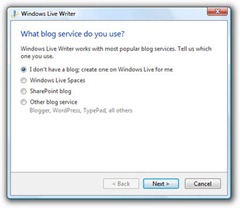
- Step 2: When you will run it for first time you will see a screen something like shown below. As it is Microsoft product, obviously it has native support for Windows Live Blog (which is good and free blogging service …. for now)
- Step 3: Choose the bottom most option, “Other Blog Service” and add URL of your blog with Username and Password (if you don’t want to be asked for password every time you post, select remember my password … but i keep it unselected)
- Side Step: Before doing anything, first go to your blog and in to setting — writing tab , go to option XML-RPC and check the check box.
These steps are good only if your post will have no images at all , but what a post will look like without any image at all ? right ? but here is another problem, for this you need to setup FTP account too.
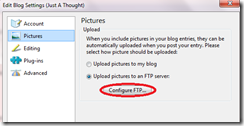
- Step 4: Once you are done with setting up account, run WLW and go to Blogs menu and then choose “Edit Blog Settings”, it will popup setup options for your blog from here choose, “Pictures” and choose, “upload pictures to FTP server” and click on Configure FTP button.
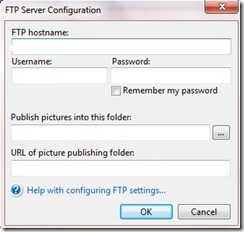
- Step 5: This will open FTP setup screen, here are you required to fill in your FTP account details like, Host name, ID, Pwd etc. But confusing part is to fill up the bottom two parts, namely… Publish pictures into this folder and URL of this folder, which is nothing but path of FTP folder which will contain all images that you will upload and URL of that folder.
That’s it. ( ofcourse only If you have done all correctly… :-D)
But believe, WLW is really great tool for writing a blog it specially if you are already familiar with other MSFT products like OFFICE. And, it is very well compatible with WordPress itself.
Its just a thought. ![]()


