Email notification is one of the most common method to provide update to users for various system events be it task completion/failures, system issues, reports etc. I have to use email notification time to time for all of those items. Once biggest complain in windows for emails is it doesn’t allow you to use basic authentication. Which means that you can’t use external SMTP servers (say Google or Yahoo) for sending email from Windows, you will always have to have your OWN SMTP server like Exchange server or other 3rd party Software. But if you have IIS 6.0 (or 5.0 I think) installed in a system you can use a feature called “Virtual SMTP Server” which can be used as … any guess ?? … yup, A SMTP Server. Since it is a virtual one it doesn’t have all bells ‘n whistles of real servers but it gets job done. It is actually ideal for basic email notification purposes and that’s just what I need ![]() . In rest of the post I am using Virtual SMTP Server (using IIS) and SMTP server interchangeably but in reality both are very different.
. In rest of the post I am using Virtual SMTP Server (using IIS) and SMTP server interchangeably but in reality both are very different.
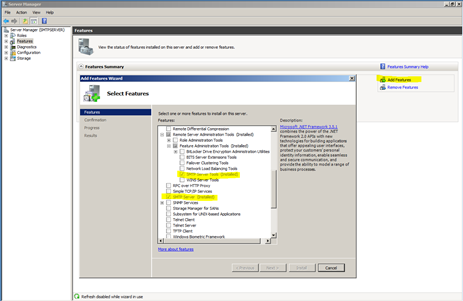
I am using Windows Server 2008 R2, so these steps are for same OS but I am sure that this process is very similar in previous versions as well. All you have to do is to open up “Server Manager” and goto “Features” section. And click on “Add Feature” this will open up “Add Features Wizard”, from that list of all features select “SMTP Server”. As soon as you select that check box a message will popup about IIS, that it will install additional IIS components too (it is because this virtual smtp server is a feature of IIS). Let wizard install required components of SMTP server.
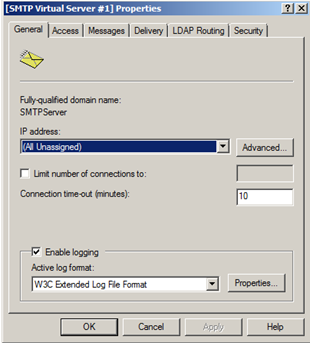
Next is configuration of SMTP server. In this step we configure that server to use Gmail’s SMTP server to send emails. For that open up IIS 6 Manager, you should see a node called “SMTP Virtual Server # 1” it is a virtual SMTP server created by default (which can be renamed/deleted). Right click on it and select “properties”.
First tab is “General” which can be used to enable logging for troubleshooting. If you want to setup access to SMTP server it can be done using second tab “Access”. In that tab, in “Access Control” section click on “Authentication”. Authentication can be applied using various method but I chose “Anonymous Access” because many windows utilities and MSFT programs doesn’t support basic authentication. And with Anonymous Access selected anyone with local access can use that server to send emails.
 |
 |
 |
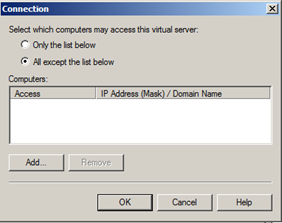
Next option we are interested is, Connection Control section it defines who can connect to that SMTP server. Click on “Connection” button, here you can configure what IP can or can’t have access to this SMTP server. I selected section option which allows all machines of network except the ones that are blacklisted.
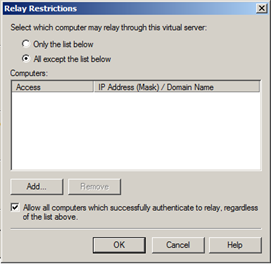
Last option on “Access” tab is “Relay Restrictions” which restricts which IPs are use this server to relay messages. Here too I selected second option which allows all machines to use this server to relay messages except the ones that are blacklisted and since this machine is just for my experiments I really don’t care much.
Next tab is “Messages” in which we are not interested. But this tab is used to configure options like size limit of message, # of messages per connection , # of recipients per message, badmail directory location etc.
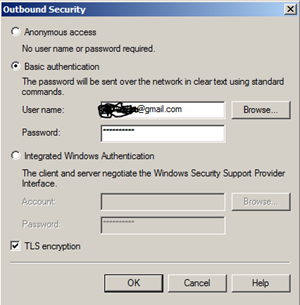
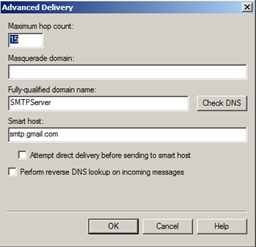
Next tab is “Delivery” this is another important tab. In the bottom it has 3 setting buttons which we will be using. First is “Outbound Security” option this is the place where we enter our credentials for Gmail’s SMTP server. Gmail SMTP requires to have TLS encryption so make sure to select that option to use TLS encryption. Next is “Outbound connection” option. The only option useful for us is TCP port number, if TLS connection is being used then port # has to be 587 (for Gmail). Other settings are # of connection or timeout can also be configured in this page. Next option is “Advanced” in here make sure that FQDN of server can be resolved by clicking on “Check DNS” button. And also in Smart host field enter “smtp.gmail.com” to use Gmail’s SMTP.
 |
 |
There are also other two tabs, “LDAP Routing” and “Security”. In my case both of them were not required so I didn’t touch them.
With all of these settings done, run following PowerShell script to send a test mail to an email account.
 Write-Host "Sending Email"
$smtpServer = "smtpserver"
$msg = new-object Net.Mail.MailMessage
$smtp = new-object Net.Mail.SmtpClient($smtpServer)
$msg.From = "fromEmail"
$msg.To.Add("ToEmail")
$msg.subject = "SMTP Server Test"
$msg.body = "SMTP Server Configuration is correct"
$smtp.Send($msg)
Write-Host "Email Sent"
And if everything is configured correctly, you should see an email delivered to your inbox relayed from your SMTP server.
That’s it for now.
It’s Just A Thought … ![]()

