Do you happen to have a situation where you have spare Raspberry Pi laying around and get some project in mind… but don’t have spare monitor/keyboard/mouse? Or you are simply lazy like me to get off desk to put things together ![]() ? I found out that it is really simple to actually do headless installation of Raspbian. And this is how you do that…
? I found out that it is really simple to actually do headless installation of Raspbian. And this is how you do that…
First you need to get current image of Raspbian. It can (and should) be downloaded from official site here. Next you need is a tool to flash that image into flash memory. My current favorite is Etcher. I find it’s interface very minimalistic and clean… And really easy to use. As far as storage medium, it is recommended to use good class 10 micro sd card. I usually use one from Sandisk or Samsung. It is advisable to use card that can withstand good amount of read and write cycle. This unfortunately is very important because Pi itself doesn’t have on board storage, meaning everything is stored on micro sd card. If it gets damaged or corrupted, you will lose your data. So quality of micro SD card is very important.
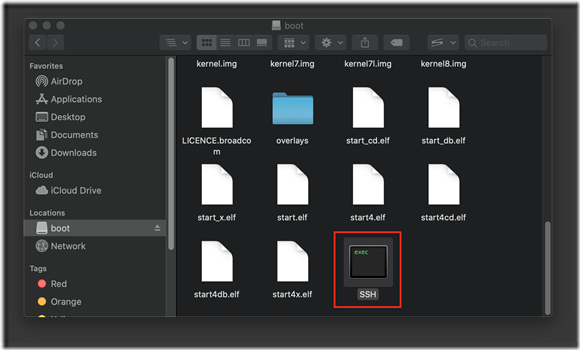
Once image is flashed and ready for use, normally if you have monitor, mouse and keyboard connected you would just plug micro SD card in device and power it up. But for our case since we want to do headless installation, one extra step is required. As mentioned in official document, you just need to manually create one file called “SSH” (no extension) into BOOT directory. This enables SSH when device boots up for first time. Normally you would do that at first boot but since we don’t have any display attached to it we are just enabling most basic feature at boot. Using SSH we can do almost anything including adding other features like enabling VNC.
Next step is to power up that puppy and connect it to network. Once it is booted, you need to find device’s IP address so you can SSH to it. I am using an open source IP Scanner tool called Angry IP Scanner. It is fast and multi platform tool so I love it. If everything is done correctly, you should see your device listed as “raspberrypi”.
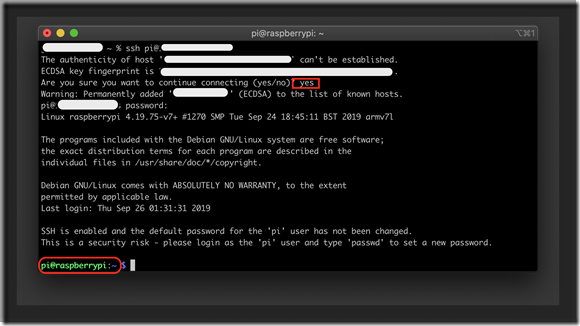
Last step is to try your luck… I mean ssh to device using IP you found using IP scanner. If device is booted correctly you should be able to log into it.
now you can run “sudo raspi-config” to trigger setup screen for raspberry pi to setup various options like, expanding storage to use whole sd or enable VNC server.
That’s it for now… ![]()


